| How to install CANalyzer 5.2 with Kvaser hardware. This note also explains the basics on how to set up a configuration in CANalyzer with several CAN and LIN channel. Please note that since version 7.1 of CANalyzer Kvaser hardware are no longer supported. |
|
|
| 1. Close all programs. Shut-down all programs before you proceed. |
|
|
| 2. Kvaser – Install. Install the drivers and your hardware from Kvaser. If you need detailed instructions, please follow the “Driver and Hardware Installation Guides For Windows” note in the Support Note Index. Otherwise, please proceed. |
|
|
| 3. Vector – Install Application. Insert the Vector CD, and press “Install Application” and follow the on-screen instructions. |
 |
|
|
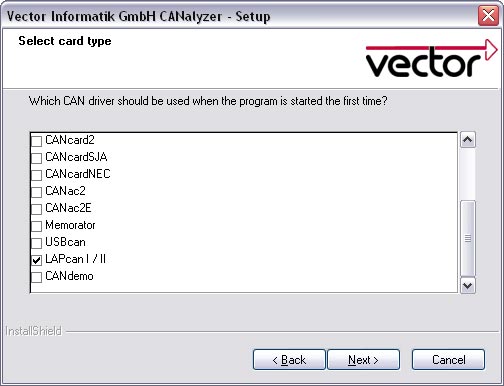
| 4. Vector – Select CAN card. During the set up of the installation, your are asked to select CAN hardware. It does not matter which type of hardware you specify, i.e. although you will use Kvaser Leaf Professional you can specify any of the Kvaser hardware types, as shown below. In this example we will use Kvaser Leaf Professional. Kvaser Leaf Professional is supported under CANalyzer 5.2 by Vector GmbH. |
 |
|
|
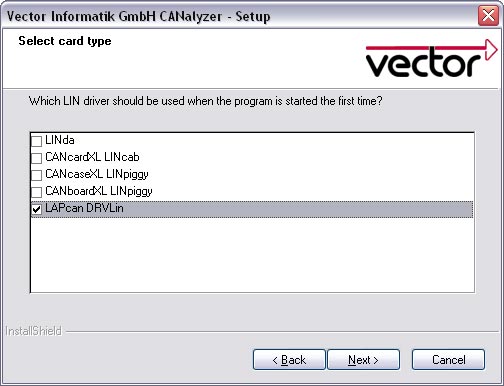
| 5. Vector – Select LIN card. In the next dialogue, you are asked to select LIN hardware. Simply press LAPcan DRVlin for using a LIN product from Kvaser, as shown below. Then complete the remaining parts of the set up and install the software. |
 |
|
|
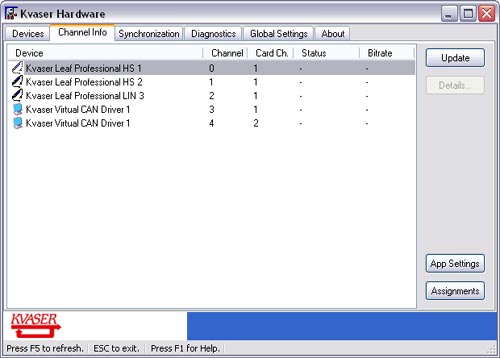
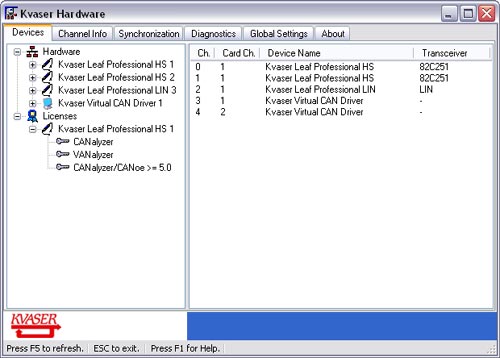
| 6. Vector – Channel Info. When the installation process has finished, open the Control Panel. And double click on the “Kvaser hardware” icon. Select “Channel Info”, as shown in the picture below. In this example, we will use 2 CAN channels and 1 LIN channel. |
 |
|
|
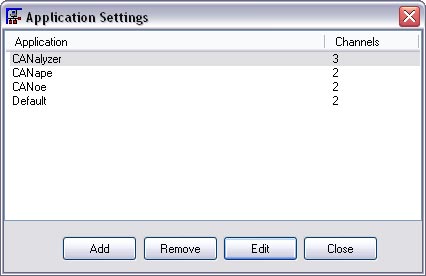
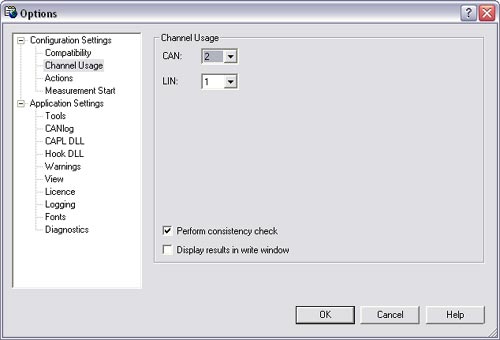
| 7. Vector – Application Settings. When you are about to use more than two channels, you need to change the number of channels used. Simply press “App Settings” button under “Channel Info”. Then select “Edit” in the “Application Settings” window, and specify the number of channels you wish to use, as shown below. |
 |
|
|
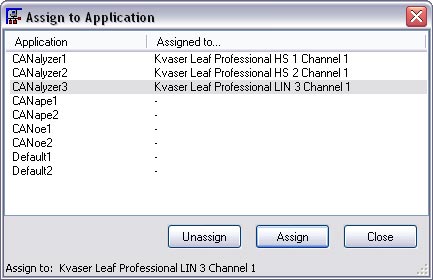
8. Vector – Assign to application. Select “Channel Info” again and select a channel. This is how you assign a channel:
|
 |
|
|
| 9. Vector – Check Licenses. In the menu, select “Devices”. If you got licenses on your hardware, you will see an icon labeled “Licenses” in the left column.Please note that CANalyzer/CANoe version 5.2 with LIN option requires three licenses bits on your Kvaser hardware. |
 |
|
|
| 10. Vector – Start CANalyzer 5.2. Start CANalyzer 5.2 and select “New configuration” under the File menu. You will now have a clean configuration file to start working with. Now, select “Options” under “Configurations” in the menu and specify the number of channels you wish to use, as shown in the picture below. |
 |
|
|
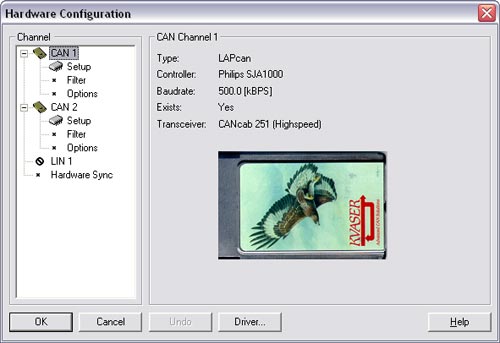
| 11. Vector – Hardware Configuration. Select “Hardware Configuration” under “Configuration” in the menu. And specify the baud rates for CAN1, CAN2 and LIN1.Dont forget to select “Filter” under the CAN2. CAN1 default setting is to pass all traffic (X means do not consider bit value). CAN2 default setting is to block all traffic. To let CAN2 pass all traffic set the value of the bit Masks to 0. |
 |
|
|
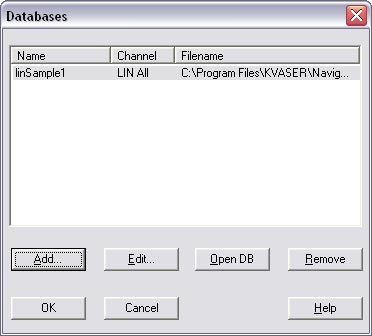
| 11. Vector – Select CAN database, LIN database or LIN Description File. To associate a *.dbc or *.ldf file in your configuration, select “Associate database..” under File in the menu. |
 |
|
|
| 6. Press “Run”. You can now use your Kvaser hardware with CANalyzer/CANoe. |
 |
03/01/2014
by Jesse Paliotto