KVASER CANlib 与 Python第1部分:初始设置

  • 2021-12-14
  • Anton Carlsson

这是介绍Kvaser CANlib SDK和Python包canlib的两篇文章的第一篇。

在这部分内容中,我们将介绍如何理解和使用Python CANlib Wrapper。这包括下载所需的软件,连接必要的硬件以及在使用Kvaser通讯仪发送报文时使用的基本编码。

作者:Anton Carlsson,软件开发人员
共同作者:L-G Fredriksson,现场应用工程师

版本:2021-08-09A

通过这个分步教程,我们将指导您如何使用Python、Kvaser CAN通讯仪以及Python package lib来发送和接收报文。Kvaser CANlib是适用于所有Kvaser CAN硬件的平台,支持控制CAN通讯仪的大部分功能。canlib包是一个Python封装,允许用户同时使用Kvaser CANlib与Python。本指南仅限于Kvaser CANlib软件支持的Windows和Linux系统。

用户通常会使用命令行应用程序。在本指南中,我们将使用Windows PowerShell,它已默认安装在Windows 7 SP1和Windows Server 2008 R2 SP1或任何更新版本上。如果您想使用PowerShell之外的其他应用程序,我们也表示欢迎。

本文的目标读者有哪些?

本指南面向那些想要设置和使用带有CANlib和Python CANlib包/封装的Kvaser CAN通讯仪的用户。
在使用本指南之前,用户需要对下述内容有些许了解(或能够查阅以下内容):

  • 对将要使用的操作系统有一定了解。在使用Linux而非Windows时,则需掌握更多的知识。
  • 知道如何打开和使用命令行应用程序中的基本命令,比如命令提示符或Windows PowerShell。
  • 理解编程的工作原理并非是必要的,但会有所帮助。另外,如果拥有Python的相关经验,都将极大简化学习过程。

1 为CANlib准备Python

1.1 所需硬件

为了完成本指南的第一步,即发送和接收CAN报文,我们需要用到以下硬件:

  • 一台装有Windows或Linux(对于Linux,最好是Ubuntu版本)操作系统(OS)的计算机。
  • 两个CAN通道,我们可以使用具有两个通道的CAN通讯仪或分别具有一个通道的两个通讯仪。在此处,我将使用Kvaser USBcan Pro 2xHS v2(00752-9)。
  • 如果没有可用通讯仪,可以在第一步中使用虚拟通讯仪。
  • 端接正确的CAN总线。在此处,我将使用T-Connector v2(00776-5),并将电阻设置为60欧姆。
  • 根据将要用到的通讯仪数量和可用的USB端口,可能需要一个USB集线器将所有设备连接到计算机上。

1.2 更改计算机并下载软件

我们需要对计算机进行更改并下载软件。需要对计算机进行以下更改:

  • 您必须具有计算机的管理员权限,以便进行必要更改。
  • 最新版本(或至少版本3.7以上)的Python。
  • CANlib软件开发工具包软件。
  • Kvaser CANlib驱动程序。
  • 任何最终文本编辑器(Idle会自动与Python一起安装,本指南中将主要使用它)。

1.3 Windows

如果您使用的是Windows操作系统,请查看以下部分,以了解如何为Windows下载所需的软件。对于Linux操作系统,请查看下一部分。

1.3.1 下载并安装Python(Windows)

第一步是安装Python。关于Python的详细安装指南,请访问RealPython.com安装Python。以下是在Windows系统安装Python的简要说明:

1.3.1.1 检查Python版本(Windows)

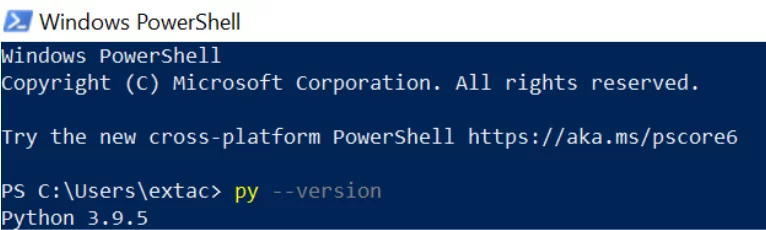
在安装Python之前,请检查它是否已安装。打开PowerShell(通过选择windows键并搜索“powershell”),然后键入以下命令之一:

> py –version

> py -V

(–version和-V可互换使用)

如果已经安装了Python,输出将显示(截至2021年6月15日,Python 3.9.5是最新版本):

Python 3.9.5

如果未安装Python,则输出将类似于:

未找到Python;在没有参数的情况下运行,以从Microsoft应用商店安装,或从“Settings(设置)”>“Manage App Execution Aliases(管理应用执行别名)”禁用此快捷方式。

“Py”未被识别为内部或外部命令、可操作程序或批处理文件。

如果未安装Python或安装的版本太旧,我们需要安装新版本。如果已经安装了可接受的Python版本(3.7+),请跳过下一部分。

1.3.1.2 安装Python(Windows)

我们需要v3.7或更高版本的Python。在本指南中,我们将只探讨一种Python安装方法。

首先下载安装程序(有关在Windows系统安装Python的更多详细信息,请访问realpython.com):

  1. 打开Python.org的windows下载页面
  2. 在“Download the latest version for Windows(为Windows下载最新版本)”下,点击下载Python按钮,以下载Python的最新版本。

当安装程序下载完成后,双击以运行。此时会出现一个对话框。有关该对话框,请注意以下4个事项:

  1. 默认安装路径位于当前Windows用户的AppData/目录中。
  2. “The Customize installation(自定义安装)”按钮可以自定义安装位置和选择安装的附加功能。
  3. “Install launcher for all users (recommended) 为所有用户安装启动器(推荐)”为默认选项。这意味着计算机上的每个用户都可以访问py.exe启动器。
  4. “The Add Python to path checkbox(将Python添加到路径)”复选框默认未选中。这不是必需的,因为安装后py会自动获得路径。
    现在,您已经安装了Python。

现在,您已经安装了Python。

为确保安装成功,请在PowerShell中运行以下命令:

> py –version

结果应该类似于:

Python 3.9.5

1.3.2 使用虚拟环境(Windows)

为了方便地运行Python,建议使用虚拟环境。有关虚拟环境的定义,其必要性以及安装方式的更详细描述,请访问RealPython.com的python虚拟环境页面了解。使用虚拟环境的目的是帮助存储目录和接收诸如canlib之类的站点包。

要在windows中创建虚拟环境,请在powershell中运行以下命令:

> py -3 -m venv .venv –prompt .

“py -3” 规定Windows启动Python 3的最新版本,有关启动器的更多信息,请查看文档。 “-m” 表示您要运行一个模块,“venv” 是模块的名称。“.venv” 决定了虚拟环境中创建的目录的名称。“–prompt” 被激活时,将更改虚拟环境的名称,“.” 指定名称应与当前目录相同。

要激活虚拟环境,请在powershell中运行以下命令,结果应该类似于:

> .\.venv\Scripts\activate

(pyproj)>

此代码运行activate脚本(脚本是带有Python代码的文件)。该脚本位于.venv目录中的Scripts目录中。如果我们在PowerShell中运行并得到错误消息:

cannot be loaded because running scripts is disabled on this system.(无法加载,因为在此系统上禁用了运行脚本。)有关更多信息,请参见https:/go.microsoft.com/fwlink/?LinkID=135170 中的about_Execution_Policies。

然后,我们需要获得运行脚本的权限。我们可以运行:

> Set-ExecutionPolicy Unrestricted -Scope Process

在powershell中获取此会话的权限,或者我们可以运行:

> Set-ExecutionPolicy Unrestricted -Scope CurrentUser

在powershell中为当前用户获取所有后续会话的权限。

现在,我们可以单独使用环境、包和资源。要停用虚拟环境,请在powershell中键入以下命令:

> deactivate

1.3.3 下载并安装CANlib驱动程序和SDK(Windows)

在Windows上,首先我们需要安装CANlib驱动程序,您可以从Kvaser下载页面或直接从kvaser_drivers_setp.exe下载并运行“Kvaser Drivers for Windows”。

如果需要使用的不仅仅是基本的canlib库,那么还需要下载Kvaser CANlib SDK,方法是从同一Kvaser页面或直接从canlib.exe下载并安装。这将安装其他支持库的dll文件。

这两个包,“Kvaser Drivers for Windows”和“Kvaser CANlib SDK”,包含所包含dll文件的32位和64位版本。

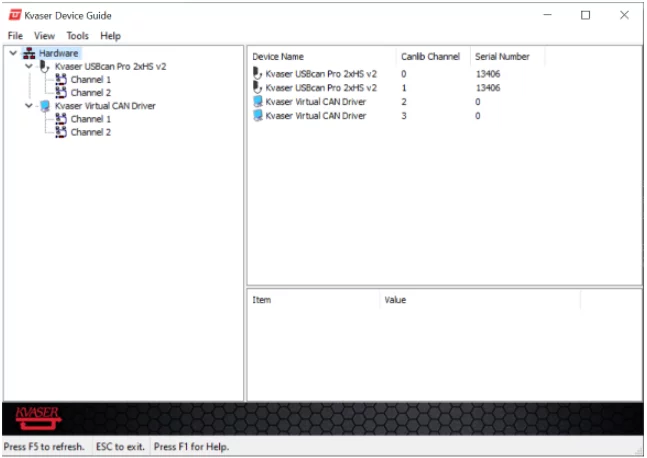
为确保驱动程序已正确安装,请按windows按钮,然后搜索“Kvaser Device Guide(Kvaser设备指南)”。如果出现“Kvaser Device Guide(Kvaser设备指南)”,则代表安装成功。

1.4 Linux

如果您使用的是Linux操作系统,以下部分将解释如何下载Linux专门需要的软件。如果您有Windows操作系统,请查看上一部分内容。

1.4.1 下载并安装Python(Linux)

第一步是安装Python。有关安装Python的不同方法的详细指南,请访问RealPython.com安装 Python。以下是在Linux下安装Python的简要概述:

1.4.1.1 检查Python版本(Linux)

在Linux下安装Python之前,请检查是否已安装或者安装了哪个版本。打开终端并尝试以下命令:

$ python –version
$ python3 –version # Used by most Linux system to invoke python v3+

如果安装了Python,则其中一个或两个命令将返回以下信息(截至2021年6月15日,Python 3.9.5是最新版本):

Python 3.9.5

如果未安装Python或安装的版本太旧,请查看下一部分内容以安装更新版本的Python。

1.4.1.2 安装Python(Linux)

如果已经安装了可使用的Python版本(3.7+),请跳过这一部分,否则请安装Python。在本指南中,我们将使用操作系统的软件包管理器。请注意,有些操作系统没有软件包管理器。请访问realpython.com了解更多信息。我们只会介绍如何在Ubuntu 18.04、Ubuntu 20.04以及更高版本上安装。有关不同操作系统的进一步说明,请访问RealPython在Linux上安装Python

对于Ubuntu,首先运行以下命令以确定本地Ubuntu版本:

$ lsb_release -a

然后,如果版本号为18.04或20.04及更高,请执行以下操作:

$ sudo apt-get update
$ sudo apt-get install python3 python3-pip

安装完成后,使用python3命令运行Python,使用pip3命令运行pip。再次运行Python3 –version以确保安装成功。

1.4.2 使用虚拟环境(Linux)

为了方便地运行Python,建议使用虚拟环境。有关虚拟环境的定义,其必要性以及安装方式的更详细描述,请访问RealPython.com的python虚拟环境页面。使用虚拟环境的目的是帮助存储目录和接收诸如canlib之类的站点软件包。

在创建虚拟环境之前,我们需要创建一个文件/目录,用于放置我们所需的虚拟环境和将使用该环境的项目。在此示例中,创建的文件名为env。

首先,使用以下命令创建一个新目录并进入其中:

$ mkdir python-virtual-environments && cd python-virtual-environments

然后,使用以下命令安装Python虚拟环境:

$ sudo apt-get install python3-venv

要在Linux中创建虚拟环境,请运行以下命令:

$ python3 -m venv .venv –prompt pyproj

“python3”指示Linux将启动Python 3的最新版本,“-m”指示我们要运行一个模块,“venv”是模块的名称。“.venv”决定将在其中创建虚拟环境的目录的名称。“–prompt”在虚拟环境被激活时更改其名称,“pyproj”指定名称应为“pyproj”。

要激活虚拟环境,我们需要运行以下命令:

$ source .venv/bin/activate
(pyproj) $

这是一条通过venv到bin最后激活的源代码路径。现在,我们可以单独使用环境、包和资源。要停用虚拟环境,请键入:

(pyproj) $ deactivate

1.4.3 下载并安装CANlib驱动程序和SDK(Linux)

在Linux中,首先通过下载和安装”Kvaser LINUX Driver and SDK”来安装CANlib,该软件可以在Kvaser下载页面中或直接从linuxcan.tar.gz中找到。

如果要使用的不仅仅是基本的canlib库,则通过下载和安装”Linux SDK库” kvlibsdk.tar.gz来获得其他支持的库。要检查是否正确安装,请运行listChannels,结果应该类似于:

(pyproj)$ /usr/doc/canlib/examples/listChannels
CANlib version 5.36
Found 4 channel(s).
ch 0: Kvaser USBcan Pro 2xHS v2 73-30130-00752-9, s/n 13406, v3.25.753 (mhydra v8.36.575)
ch 1: Kvaser USBcan Pro 2xHS v2 73-30130-00752-9, s/n 13406, v3.25.753 (mhydra v8.36.575)
ch 2: Kvaser Virtual CAN 0-00000-00000-0, s/n 1, v0.0.0 (kvvirtualcan v8.36.575)
ch 3: Kvaser Virtual CAN 0-00000-00000-0, s/n 1, v0.0.0 (kvvirtualcan v8.36.575)

2 安装Python canlib包

要使用pip安装Python包canlib,请通过PowerShell激活虚拟环境,然后运行以下命令:

.\.venv\Scripts\activate
(pyproj)> pip install canlib

为确保canlib已正确安装,请在Python解释器中运行以下代码。要打开Python解释器,只需在PowerShell中键入python或py。要了解有关Python解释器的更多信息,请访问Python文档

(pyproj)> python
Python 3.9.5 (tags/v3.9.5:0a7dcbd, May 3 2021, 17:27:52) [MSC v.1928 64 bit (AMD64)] on win32
键入“帮助”、“版权”、“信用”或“许可证”以获取更多信息。
>>> from canlib import canlib
>>> canlib.prodversion()

结果应该类似于:

VersionNumber(major=5, minor=36, release=None, build=None)

下载canlib后,如果显示以下报文:

WARNING: You are using pip version 21.1.1; however, version 21.1.2 is available.(警告:您使用的是版本21.1.1的pip;但是,21.1.2版本是可用的。)
您应该考虑通过“C:\Users\extac\Pyproj\.venv\scripts\python.exe -m pip install –upgrade pip”命令进行升级。

只需按照建议在PowerShell中运行以下命令:

C:\Users\extac\Pyproj\.venv\scripts\python.exe -m pip install –upgrade pip

以便将pip升级到最新版本。

3 安装硬件

3.1 安装Kvaser CAN通讯仪

(可以使用任何单路、双路或四路Kvaser CAN通讯仪。也可以在通讯仪模式下使用Kvaser Memorator。)

本指南中使用的硬件包括Kvaser USBcan Pro 2xHS v2Kvaser T-cannector v2。在将硬件连接在一起之前,请确保T-cannector设置为60欧姆(使用盒子上的开关)。所需的内部终端取决于节点的数量。60欧姆的负载将为连接到总线的任何数量的节点提供适当的隐性电平。有关终端的更多信息,请访问Kvaser.com终端

要安装USBcan,只需将其插入计算机,其余的工作将由硬件完成。两个CAN触点都需要插入T-cannector,否则通道之间将无法发送报文。报文发送后,任何正确接收报文的CAN控制器都会在报文末尾添加确认位。如果报文未被确认,发送方将重发报文,直到报文被确认为止。因此,要能够正确发送报文,它需要被接收。有关确认和CAN报文的更多信息,请访问Kvaser.com CAN报文

3.2 安装虚拟通讯仪

如果没有可用的硬件,那么可以在本指南的第一部分使用虚拟通讯仪。在安装Kvaser驱动程序时,Windows会自动安装两个虚拟通道。如果您想了解更多关于如何安装其他虚拟通道的信息,请访问Kvaser.com canlib帮助。在Linux中,如需下载虚拟设备,请转到linuxcan\virtualcan\virtualcan.h并编辑以下定义语句:

#define NR_CHANNELS 2

#define NR_VIRTUAL_DEV 1

您可以在Kvaser.com安装Linux中了解有关安装虚拟通讯仪的更多信息,如果要了解更多有关虚拟总线的一般信息,请访问Kvaser.com虚拟设备通道。如何使用虚拟通讯仪将在本指南的后续部分中介绍。

4 验证安装

要测试所有软件和硬件是否已正确安装,请在您使用的代码编辑器中编写以下代码,确保该文件与虚拟环境位于同一目录中。

如果您没有代码编辑器,idle将与Python一起安装在Windows上。若要在虚拟环境下使用idle,请在PowerShell中运行以下命令:

(pyproj)> python -m idlelib

这将打开一个idle窗口,您可以在其中打开代码文件并使用f5或通过运行选项卡运行代码。如果我们通过右键单击.py文件并选择” edit with idle(使用idle编辑)”来打开idle,那么将无法直接使用f5或通过运行选项卡运行代码。

我们需要在虚拟环境内运行的脚本是check_ch,其中包括以下代码:

# check_ch
# Firstly import canlib so that it can be used in the script.
from canlib import canlib

# .getNumberOfChannels() is used to detect the number of channels and
# the number is saved in the variable num_channels.
num_channels = canlib.getNumberOfChannels()

# num_channels is printed out as text so that the user can see how many
# channels were found.
print(f"Found {num_channels} channels")

# Next a for loop is created. This loop will repeat the code within for each
# channel that was detected. 
for ch in range(num_channels):
# The data of each specific channel is saved in chd.
    chd = canlib.ChannelData(ch)
# Lastly the channel, channel name, product number, serial number, and local 
# channel number on the device are printed.
    print(f"{ch}. {chd.channel_name} ({chd.card_upc_no.product()}:{chd.card_serial_no}/{chd.chan_no_on_card})")

要从PowerShell中运行代码,请转到文件和虚拟环境所在的目录。启动虚拟环境并使用以下命令启动名为check_ch.py的脚本:

.\.venv\Scripts\activate
(pyproj)> py check_ch.py

结果应当显示为

Found 4 channels
0. Kvaser USBcan Pro 2xHS v2 (channel 0) (00752-9:13406/0)
1. Kvaser USBcan Pro 2xHS v2 (channel 1) (00752-9:13406/1)
2. Kvaser Virtual CAN Driver (channel 0) (00000-0:0/0)
3. Kvaser Virtual CAN Driver (channel 1) (00000-0:0/1)

假设所有软件和硬件都正确安装,0-3是CANusb上可用的通道。在此示例中,我们将仅使用通道0和1。在Linux上,默认情况下不会有虚拟通道。

也可以使用Kvaser设备指南。只需打开该应用程序,我们应该会看到类似以下的内容:

在这个窗口中,我们可以看到我们插入的Kvaser USBcan Pro 2xHS v2出现在列表的顶部。

5 发送CAN报文

5.1 简单方法

要发送基本的CAN报文,请创建一个名为send_msg.py的脚本,内容包含以下代码(确保该脚本与虚拟环境位于同一文件夹中):

#send_msg
# The CANlib library is initialized when the canlib module is imported. To be
# able to send a message, Frame also needs to be installed.
from canlib import canlib, Frame

# Firstly, open two CAN channels, one to send the message and one to receive.
# Note that there needs to be a channel to receive, as otherwise the message
# can not be sent. In this example the channels are named ch_a and ch_b. To
# open the channels call on the openChannel method inside of canlib and, as an
# input put in channel=0 and channel=1. Where 0 and 1 represents the two
# CANlib channels 0 and 1.
ch_a = canlib.openChannel(channel=0)
ch_b = canlib.openChannel(channel=1)

# After opening the channel, we need to set the bus parameters. Some
# interfaces keep their params from previous programs. This can cause problems
# if the params are different between the interfaces/channels. For now we will
# use setBusParams() to set the canBitrate to 250K.
ch_a.setBusParams(canlib.canBITRATE_250K)
ch_b.setBusParams(canlib.canBITRATE_250K)

# The next step is to Activate the CAN chip for each channel (ch_a and ch_b in
# this example) use .busOn() to make them ready to receive and send messages.
ch_a.busOn()
ch_b.busOn()

# To transmit a message with (11-bit) CAN id = 123 and contents (decimal) 72,
# 69, 76, 76, 79, 33, first create the CANFrame (CANmessage) and name it. In
# this example, the CANFrame is named frame. Then send the message by calling on
# the channel that will act as the sender and use .write() with the CANFrame
# as input. In this example ch_a will act as sender.
frame = Frame(id_=123, data=[72, 69, 76, 76, 79, 33], flags=canlib.MessageFlag.STD )
ch_a.write(frame)

# To make sure the message was sent we will attempt to read the message. Using
# timeout, only 500 ms will be spent waiting to receive the CANFrame. If it takes
# longer the program will encounter a timeout error. read the CANFrame by calling
# .read() on the channel that receives the message, ch_b in this example. To
# then read the message we will use print() and send msg as the input.
msg = ch_b.read(timeout=500)
print(msg)

# After the message has been sent, received and read it is time to inactivate
# the CAN chip. To do this call .busOff() on both channels that went .busOn()
ch_a.busOff()
ch_b.busOff()

# Lastly, close all channels with close() to finish up.
ch_a.close()
ch_b.close()

# Depending on the situation it is not always necessary or preferable to go of
# the bus with the channels and, instead only use close(). But this will be
# talked more about later.

要运行前述程序,请激活您的虚拟环境并使用powershell运行脚本。运行该程序将会产生以下类似的结果:

> .\.venv\Scripts\activate
(pyproj)> py send_msg.py
Frame(id=123, data=bytearray(b'HELLO!'), dlc=6, flags=<MessageFlag.STD: 2>, timestamp=9)

5.1.1 打开虚拟通讯仪

如果我们想要使用虚拟通讯仪和虚拟通道,我们需要更改openchannel命令。首先,我们需要将数字从0和1更改为2和3,以表示虚拟通道。然后,我们需要添加一个表示ACCEPT_VIRTUAL的标志(另一个输入),以定义虚拟通道将被使用和接受。命令现在将如下所示:

canlib.openChannel(channel=2, flags=canlib.open.ACCEPT_VIRTUAL)

如果我们不添加ACCEPT_VIRTUAL标志,将会收到“Specified device not found (-3)(指定设备未找到(-3))”的错误。另外还需注意,虚拟通道只能与另一个虚拟通道通讯。

5.2 更具Python风格的方式

发送CAN报文中使用的代码是种非常标准和直接的脚本编写方式。然而,通过Python,我们能够以更具“Python风格的方式”编写代码。这将生成以下脚本名send_msg_pyt.py:

# send_msg_pyt
from canlib import canlib, Frame

# instead of opening the two channels and closing them one by one, we will use a
# with statement. Using the with statement to open one or more channels with
# canlib.openChannel(i) as ch_x. Within this with statement we will write the
# rest of the code.
with canlib.openChannel(2) as ch_a, canlib.openChannel(3) as ch_b:

# Instead of going on bus with "copy-paste" for each channel, we will use a
# for-loop. Within this loop we will go through a list of all channels opened
# using the with statement. Currently we only have two channels, which makes
# the for-loop somewhat unnecessary. However, when we start using more
# channels the for-loop will be preferred.
    for ch in [ch_a, ch_b]:
        ch.busOn()

    frame = Frame(id_=123, data=[72, 69, 76, 76, 79, 33])
    ch_a.write(frame)

    msg = ch_b.read(timeout=500)
    print(msg)

# After we run out of code within the with statement and exit it, we don't
# need to manually close it or go off bus. The channels that were open using
# the with statement will be automatically closed, and with the channels being
# closed they also went off the bus.

5.3 使用WriteWait

在编写多条报文时,我们有时候想要确认它们是否已正确发送。为此,我们将使用writeWait()命令。writeWait在发送报文时的操作与write相同,但它也会给出等待报文发送的超时限制。

该命令可能如下所示:writeWait(frame, timeout=500),它将使用帧提供的详细信息发送报文,并在返回错误消息“Timeout occurred (-7)(发生超时(-7))”之前等待500毫秒以使其发送完成。WriteWait可用于发送一个或多个报文。在发送多个报文时,我们可以在每个报文上使用writeWait,但这将花费一些时间,效率不高。相反,我们可以在除了最后一个报文之外的所有报文上使用write,并在最后一个报文上使用writeWait。如果某个报文发送失败,那么在其后的所有报文都将失败,writeWait将引发超时错误“Timeout occurred (-7)(发生超时(-7))”。

为了测试writeWait,我们将创建两个脚本,分别称为send_msg_wait.py和send_msgs_wait.py,它们将基于发送报文代码,但进行了一些更改。第一个脚本send_msg_wait.py将使用writeWait发送一条成功报文和一条不成功的报文:

# send_msg_wait
from canlib import canlib, Frame

# We will now open three channels, two from the USBcan and one on
# the leaf pro which we will not connect to the T-cannector. We will use the
# leaf pro channel ch_c to send errorframes.
with canlib.openChannel(2) as ch_a, canlib.openChannel(3) as ch_b, canlib.openChannel(4) as ch_c:
    for ch in [ch_a, ch_b, ch_c]:
        ch.busOn()

    frame = Frame(id_=123, data=[72, 69, 76, 76, 79, 33])
    
# Instead of using write we will now use writeWait(). We will attempt to send
# a message for 500 milliseconds, if the message is not sent we will receive a
# Timeout occured error.
    ch_a.writeWait(frame, timeout=500)

# We will now try to send a message with the channel not connected to the
# T-cannector. This should result in a Timeout occurred error.
    ch_c.writeWait(frame, timeout=500)

    msg = ch_b.read(timeout=500)
    print(msg)


在下一个脚本send_msgs_wait-py中,我们将发送多条报文,并使用waitWrite确保报文已发送:

# send_msgs_wait
from canlib import canlib, Frame

# We will now open three channels, two from the USBcan and one on the
# leaf pro which we will not connect to the T-cannector. We will use the
# leaf pro channel ch_c to send errorframes.
with canlib.openChannel(2) as ch_a, canlib.openChannel(3) as ch_b, canlib.openChannel(4) as ch_c:
    for ch in [ch_a, ch_b, ch_c]:
        ch.busOn()

    frame = Frame(id_=123, data=[72, 69, 76, 76, 79, 33])
    
# We will now send 199 messages in a for-loop and after the loop use writeWait
# to send a last message, to make sure all previous messages were sent.
    for i in range(199):
        ch_a.write(frame)
    ch_a.writeWait(frame, timeout=500)

    msg = ch_b.read(timeout=500)
    print(msg)

# We will now do the same with the ch_c channel not connected to the
# T-cannector. This should result in a timeout error.
    for i in range(199):
        ch_c.write(frame)
    ch_c.writeWait(frame, timeout=100)

    msg = ch_b.read(timeout=500)
    print(msg)

6 基本错误的故障排除

在使用Python canlib和CAN通讯仪时,我们可能会遇到多种错误和问题。现在,我们将讨论一些常见的错误报文和问题:

  • 红色闪烁灯:快速闪烁的红色CAN灯表示接收到了多个错误帧,这意味着在报文传输过程中可能发生了问题。可能出现的三种问题是:
  1. 只有一个通道连接到CAN总线(连接到T-cannector)。
  2. 只有一个通道处于总线开启状态(该通道已经执行busOn())。
  3. 接收或传输总线处于静默模式。

要解决此问题,首先关闭接收到错误信息的通道的总线,以使红灯停止闪烁。然后确保至少有两个通道连接到T-cannector,并在总线上处于正常模式,一个用于发送报文,一个用于接收报文。

  • 没有可用报文(-2):当我们在没有发送报文或发送报文出错的情况下调用read()时,会发生此错误,例如,因为它的比特率不正确。这可能是因为write()未被调用或传输通道处于静默模式,导致报文未发送。要解决此问题,请确保已使用帧正确调用了write()、传输通道处于正常模式,并且比特率与接收通道使用的比特率相同。
  • 传输缓冲区溢出(-13):当我们试图发送许多信息但全部失败时,这些信息将在传输缓冲区中“排队”。这将导致以后的所有报文也发送失败,尽管发送是正确的。如果通道处于总线上,LED将开始闪烁红色。这可能是因为使用静默设备发送了许多报文或使用不在总线上的设备发送了报文。如果通道在总线上但是静默的,红灯会开始闪烁。要解决此问题,首先通过关闭总线再打开总线来清除传输缓冲区(还可以将设备断开连接并重新连接到计算机)。如果这不能解决问题,请确保所有总线都处于总线上,可以使用.busOn或者检查通讯仪是否连接到T-cannector上。
  • 检测到硬件错误(-15):如果我们尝试与未连接的设备交互,将收到此错误通知。最有可能的情况是设备未通过USB连接,程序启动后被移除,或者某行代码在某处调用了错误的设备。要解决此问题,请仔细检查所有设备是否通过USB连接,如果还不行,请仔细检查用于识别设备的所有代码。
  • 发生超时(-7):超时是当用户设置程序等待某个事件发生的超时限制时引发的错误。如果等待时间太长,将引发错误,我们就会知道出了问题。要解决这个问题,我们需要仔细检查代码以找到问题。问题可能是写入通道不在总线上或处于静默模式。

7 获取信息的途径

有多种方式可以获取有关CANlib的信息。有关canlib和与canlib一起使用的命令的最佳信息来源是pycanlib.readthedocs.io。如果readthedocs无法正常工作,那么Kvaser的网站Kvaser.com上有多个博客解释了canlib的不同方面。在Kvaser网站上,我们还可以在支持页面canlib网络帮助中找到更多信息,包含开始使用Kvaser硬件的基本资源、用户指南等文档、开发者工具以及用于计算比特率的计算器。如果您没有找到所需内容,请将您的问题和疑问通过电子邮件发送至SUPPORT@KVASER.COM,随时联系我们获得支持。。

例如,在前面的脚本中,我们想要读取报文。但是在报文被正确接收和读取之前,我们不希望继续执行下一行。此外,如果无法读取报文,我们还希望程序停止并返回错误消息。要找到实现这一点的最佳方法,请参阅pycanlib.readthedocs上的文档。

为了找到正确的文档,首先我们需要展开“Using canlib”选项卡。下一步是了解使用方式和用途。目前,我们要发送一条报文,刚好有一个名为“Send and Receive”的选项卡,我们可以展开它。接下来,我们看到“Reading Messages”也是一个标题,那么点击它,直接转到读取报文。在“read”标题下阅读时,我们最终会看到一系列功能列表。其中一项功能如下:“If you want to wait until a message arrives (or a timeout occurs) and then read it, call read with a timeout(如果要等到报文到达(或发生超时)然后读取它,请调用带有超时的read)”。这看起来就是我们所需要的。要了解更多关于该函数的信息,我们可以单击标有“read”的链接直接转到“read”函数。现在我们可以看到“read”有一个名为“timeout”的参数,它是一个整数。该整数决定程序在返回超时错误之前等待报文传递的毫秒数。现在我们已经找到了我们要找的内容,可以将其输入到我们的代码中,例如channel.read(timeout = 500),以使程序等待500毫秒。

8 快速入门与关键命令

如果您中断了操作或忘记了使用的命令/流程,请使用以下强大的命令和说明列表。

  • 启动Windows Powershell:
    powershell.exe
  • 切换到您存放Python脚本的目录:cd(如果您已经有一个虚拟环境并且具有运行权限,则跳过接下来的两个步骤)
  • 创建一个虚拟环境:
    py -3 -m venv .venv –prompt .
  • 如果您是使用新计算机或没有权限的新用户:
    Set-ExecutionPolicy Unrestricted -Scope CurrentUser
  • 激活虚拟环境:
    .\.venv\Scripts\activate
  • 如果您尚未在此虚拟环境中安装canlib,请执行以下操作:
    pip install canlib
  • 运行脚本:py check_ch.py(check_ch.py一直可以运行,以确保所需的通讯仪已连接)
  • 启动编辑器:
    python -m idlelib
    python -m idlelib check_ch.py
  • 停用虚拟环境:
    deactivate
Author Image

Anton Carlsson

Anton Carlsson是Kvaser AB的一名软件实习生。

联系我们