这是第二篇介绍Kvaser CANlib和Python CANlib Wrapper的文章。
在本文中,我们将介绍涉及CAN的一些典型场景,了解在使用CAN时的不同命令和功能,并更广泛地了解CAN、CANlib和Kvaser通讯仪。
作者:Anton Carlsson, 软件开发人员
共同作者:L-G Fredriksson,现场应用工程师
版本:2021-08-09A
本文的目标读者有哪些?
本指南面向那些想要设置和使用带有CANlib和Python CANlib包/封装的Kvaser CAN通讯仪的用户。
在使用本指南之前,用户需要对下述内容有些许了解(或能够查阅以下内容):
- 对将要使用的操作系统有一定了解。在使用Linux而非Windows时,则需掌握更多的知识。
- 知道如何打开和使用命令行应用程序中的基本命令,比如命令提示符或Windows PowerShell。
- 理解编程的工作原理并非是必要的,但会有所帮助。另外,如果拥有Python的相关经验,都将极大简化学习过程。
为CANlib准备Python
请阅读文档:Kvaser CANlib & Python第1部分,初始设置
请注意:文中的其中一些示例是为三个通讯仪编写的。
快速入门与关键命令
如果您中断了操作或忘记了使用的命令/流程,请使用以下强大的命令和说明列表。
- • 启动Windows Powershell:
powershell.exe
- • 切换到您存放Python脚本的目录:cd(如果您已经有一个虚拟环境并且具有运行权限,则跳过接下来的两个步骤)
- • 创建一个虚拟环境:
py -3 -m venv .venv --prompt.
- • 如果您是使用新计算机或没有权限的新用户:
Set-ExecutionPolicy Unrestricted -Scope CurrentUser
- • 激活虚拟环境:
.\.venv\Scripts\activate
- • 如果您尚未在此虚拟环境中安装canlib,请执行以下操作:
pip install canlib
- • …
- • 运行脚本:
py check_ch.py”(check_ch.py一直可以运行,以确保所需的通讯仪已连接)
- • 启动编辑器:
python -m idlelib
python -m idlelib check_ch.py
- • …
- • 停用虚拟环境:
deactivate
发送CAN报文
(此部分内容是从《Kvaser CANlib & Python第1部分,初始设置》中复制)
简单方法
要发送基本的CAN报文,请创建一个名为send_msg.py的脚本,内容包含以下代码(确保该脚本与虚拟环境位于同一文件夹中):
#send_msg
#The CANlib library is initialized when the canlib module is imported. To be
# able to send a message, Frame also needs to be installed.
from canlib import canlib, Frame

# Firstly, open two CAN channels, one to send the message and one to receive.
# Note that there needs to be a channel to receive, as otherwise the message
# can not be sent. In this example the channels are named ch_a and ch_b. To
# open the channels call on the openChannel method inside of canlib and, as an
# input put in channel=0 and channel=1. Where 0 and 1 represents the two
# CANlib channels 0 and 1.
ch_a = canlib.openChannel(channel=0)
ch_b = canlib.openChannel(channel=1)

# After opening the channel, we need to set the bus parameters. Some
# interfaces keep their params from previous programs. This can cause problems
# if the params are different between the interfaces/channels. For now we will
# use setBusParams() to set the canBitrate to 250K.
ch_0.setBusParams(canlib.canBITRATE_250K)
ch_1.setBusParams(canlib.canBITRATE_250K)

# The next step is to Activate the CAN chip for each channel (ch_a and ch_b in
# this example) use .busOn() to make them ready to receive and send messages.
ch_a.busOn()
ch_b.busOn()

# To transmit a message with (11-bit) CAN id = 123 and contents (decimal) 72,
# 69, 76, 76, 79, 33, first create the CANFrame (CANmessage) and name it. In
# this example, the CANFrame is named frame. Then send the message by calling on
# the channel that will act as the sender and use .write() with the CANFrame
# as input. In this example ch_a will act as sender.
frame = Frame(id_=123, data=[72, 69, 76, 76, 79, 33])
ch_a.write(frame)

# To make sure the message was sent we will attempt to read the message. Using
# timeout, only 500 ms will be spent waiting to receive the CANFrame. If it takes
# longer the program will encounter a timeout error. read the CANFrame by calling
# .read() on the channel that receives the message, ch_b in this example. To
# then read the message we will use print() and send msg as the input.
msg = ch_b.read(timeout=500)
print(msg)

# After the message has been sent, received and read it is time to inactivate
# the CAN chip. To do this call .busOff() on both channels that went .busOn()
ch_a.busOff()
ch_b.busOff()

# Lastly, close all channels with close() to finish up.
ch_a.close()
ch_b.close()

# Depending on the situation it is not always necessary or preferable to go of
# the bus with the channels and, instead only use close(). But this will be
# talked more about later.
要运行前述程序,请激活您的虚拟环境并使用powershell运行脚本。运行该程序将会产生以下类似的结果:
> .\.venv\Scripts\activate
(pyproj)> py send_msg.py
Frame(id=123, data=bytearray(b'HELLO!'), dlc=6, flags=<MessageFlag.STD: 2>, timestamp=9)
打开虚拟通讯仪的简单方法
如果我们想要使用虚拟通讯仪和虚拟通道,我们需要更改openchannel命令。首先,我们需要将数字从0和1更改为2和3,以表示虚拟通道。然后,我们需要添加一个表示ACCEPT_VIRTUAL的标志(另一个输入),以定义虚拟通道将被使用和接受。命令现在将如下所示:
canlib.openChannel(channel=2, flags=canlib.open.ACCEPT_VIRTUAL)
如果我们不添加ACCEPT_VIRTUAL标志,将会收到“Specified device not found (-3)(指定设备未找到(-3))”的错误。另外还需注意,虚拟通道只能与另一个虚拟通道通讯。
更具Python风格的方式
发送CAN报文中使用的代码是种非常标准和直接的脚本编写方式。然而,通过Python,我们能够以更具“Python风格的方式”编写代码。这将生成以下脚本名send_msg_pyt.py:
# send_msg_pyt
from canlib import canlib, Frame

# instead of opening the two channels and closing them one by one, we will use a
# with statement. Using the with statement to open one or more channels with
# canlib.openChannel(i) as ch_x. Within this with statement we will write the
# rest of the code.
with canlib.openChannel(2) as ch_a, canlib.openChannel(3) as ch_b:

# Instead of going on bus with "copy-paste" for each channel, we will use a
# for-loop. Within this loop we will go through a list of all channels opened
# using the with statement. Currently we only have two channels, which makes
# the for-loop somewhat unnecessary. However, when we start using more
# channels the for-loop will be preferred.
    for ch in [ch_a, ch_b]:
        ch.busOn()

    frame = Frame(id_=123, data=[72, 69, 76, 76, 79, 33])
    ch_a.write(frame)

    msg = ch_b.read(timeout=500)
    print(msg)

# After we run out of code within the with statement and exit it, we don’t
# need to manually close it or go off bus. The channels that were open using
# the with statement will be automatically closed, and with the channels being
# closed they also went off the bus.
Wait
在编写多条报文时,我们有时候想要确认它们是否已正确发送。为此,我们将使用writeWait()命令。writeWait在发送报文时的操作与write相同,但它也会给出等待报文发送的超时限制。
该命令可能如下所示:writeWait(frame, timeout=500),它将使用帧提供的详细信息发送报文,并在返回错误报文“Timeout occurred (-7)(发生超时(-7))”之前等待500毫秒以使其发送完成。WriteWait可用于发送一个或多个报文。在发送多个报文时,我们可以在每个报文上使用writeWait,但这将花费一些时间,效率不高。相反,我们可以在除了最后一个报文之外的所有报文上使用write,并在最后一个报文上使用writeWait。如果某个报文发送失败,那么在其后的所有报文都将失败,writeWait将引发超时错误“Timeout occurred (-7)(发生超时(-7))”。
为了测试writeWait,我们将创建两个脚本,分别称为send_msg_wait.py和send_msgs_wait.py,它们将基于发送报文代码,但进行了一些更改。第一个脚本send_msg_wait.py将使用writeWait发送一条成功报文和一条不成功的报文:
# send_msg_wait
from canlib import canlib, Frame

# We will now open three channels, two from the USBcan and one on
# the leaf pro which we will not connect to the T-cannector. We will use the
# leaf pro channel ch_c to send errorframes.
with canlib.openChannel(2) as ch_a, canlib.openChannel(3) as ch_b, canlib.openChannel(4) as ch_c:
    for ch in [ch_a, ch_b, ch_c]:
        ch.busOn()

    frame = Frame(id_=123, data=[72, 69, 76, 76, 79, 33])

# Instead of using write we will now use writeWait(). We will attempt to send
# a message for 500 milliseconds, if the message is not sent we will receive a
# Timeout occured error.
    ch_a.writeWait(frame, timeout=500)

# We will now try to send a message with the channel not connected to the
# T-cannector. This should result in a Timeout occurred error.
    ch_c.writeWait(frame, timeout=500)

    msg = ch_b.read(timeout=500)
    print(msg)
在下一个脚本send_msgs_wait-py中,我们将发送多条报文,并使用waitWrite确保报文已发送:
# send_msgs_wait
from canlib import canlib, Frame

# We will now open three channels, two from the USBcan and one on the
# leaf pro which we will not connect to the T-cannector. We will use the
# leaf pro channel ch_c to send errorframes.
with canlib.openChannel(2) as ch_a, canlib.openChannel(3) as ch_b, canlib.openChannel(4) as ch_c:
    for ch in [ch_a, ch_b, ch_c]:
        ch.busOn()

    frame = Frame(id_=123, data=[72, 69, 76, 76, 79, 33])

# We will now send 199 messages in a for-loop and after the loop use writeWait
# to send a last message, to make sure all previous messages were sent.
    for i in range(199):
        ch_a.write(frame)
    ch_a.writeWait(frame, timeout=500)

    msg = ch_b.read(timeout=500)
    print(msg)

# We will now do the same with the ch_c channel not connected to the
# T-cannector. This should result in a timeout error.
    for i in range(199):
        ch_c.write(frame)
    ch_c.writeWait(frame, timeout=100)

    msg = ch_b.read(timeout=500)
    print(msg)
所需硬件
作为本指南的第二部分,我们将需要至少三个通道。因此,在第一部分中我们使用的设备没有三个通道,我们则还需要另一个设备。在本指南中,将使用Kvaser Leaf Pro HS v2以及Kvaser USBcan Pro 2xHS v2。
静默模式
当使用总线上的CAN通道(已通过busOn连接到总线上的通道)通过CANlib接收报文时,有两种可能的模式可供选择。这两种模式是正常模式和静默模式,称为总线模式。要设置总线驱动程序模式,请使用“Channel.setBusOutputControl”。
正常模式
正常模式是Kvaser通讯仪的默认模式,可使用setBusOutputControl手动设置为“canlib.canlib.Driver.NORMAL”。正常模式意味着驱动程序是标准的推拉模式。也就是说,它既可以在总线上发送(推)信息,也可以接收(拉)信息。
静默模式
静默模式由一些控制器支持,可以使用setBusOutputControl设置为“canlib.canlib.driver.SILENT”。在静默模式下,驱动程序将设置为仅接收。这意味着控制器将不会在总线上传输任何东西,甚至不会传输ack(确认)位。这适用于:当我们想要监听CAN总线而又不想以任何方式去干扰时。在调用.write时,仍然可以使用静默通道,但报文将不会被正常发送。相反,报文将进入“传输队列”而不会被发送。当传输队列中的报文过多并出现传输缓冲区溢出错误时,这一点就会变得明显。
请注意,并不是所有设备都支持静默模式。但是,当我们尝试设置不支持静默模式的设备时,将不会收到类似“设备未更改其模式”的任何指示。相反,该设备将发送报文并像正常模式下的设备一样运行。如果我们在没有更改其通道的情况下切换设备,这可能会成为问题。因此,在将通道设置为静默模式之前,我们要确保通道/设备支持静默模式。有两种方法可以做到这一点。我们可以从Kvaser网站获取用户指南,查看技术参数并在表格中确认是否支持它。或者,更可取的方法是使用channel_data。要获取通道的功能,请使用channel_data.channel_cap。然后创建一个if语句,查看channel_data.channel_cap中是否包含ChannelCap.SILENT_MODE(静默模式)。
示例
为了展示如何使用静默模式,我们将重复使用发送CAN报文的示例并进行扩展。先前使用的注释已被删除,并为新代码添加了新注释。
第一个示例显示,静默通道不会干扰来自另一个通道的发送报文。在脚本中使用以下代码:
# silent_mode
from canlib import canlib, Frame

ch_a = canlib.openChannel(channel=0)
ch_b = canlib.openChannel(channel=1)

# Using the setBusOutputControl method we set ch_a (channel 0) to normal. This
# line is not necessary, as normal is the default mode, but for the sake of
# clarity we will add it anyway. Then we do the same to the channel ch_b
# (channel 1) but set it to silent.
ch_a.setBusOutputControl(canlib.Driver.NORMAL)
# before setting the second channel, we need to make sure that the channel
# actually supports silent mode. For this we will use an if statement.
if canlib.ChannelCap.SILENT_MODE in ch_b.channel_data.channel_cap:
ch_b.setBusOutputControl(canlib.Driver.SILENT)
# If the channel does not support silent mode we will exit the program.
else:
exit()
# The rest of the code will remain unchanged.
ch_a.busOn()
ch_b.busOn()

frame = Frame(id_=123, data=[72, 69, 76, 76, 79, 33])
ch_a.write(frame)

msg = ch_b.read(timeout=500)
print(msg)

ch_a.busOff()
ch_b.busOff()

ch_a.close()
ch_b.close()
运行此silent_mode脚本会导致以下错误帧(CAN错误报文):
(pyproj)> py silent_mode.py
Frame(id=0, data=bytearray(b''), dlc=0, flags=<MessageFlag.ERROR_FRAME: 32>, timestamp=15)
该报文(帧)由通道ch_a发送,但在报文发送过程中,它变成了错误报文(错误帧)。这意味着没有其他通道收到该报文,因此未添加确认位。这表明,尽管通道ch_b读取了报文,但它没有添加确认位,这证明了静默通道不会干扰总线上发送的任何信息流。
下一个测试是使用静默通道发送报文并观察CAN通讯仪。这次我们将不编写脚本,而是使用python解释器。要启动python解释器并发送报文,请在powershell中键入以下内容:
> .\.venv\Scripts\activate
(pyproj) PS C:\Users\extac\Pyproj> py
Python 3.9.5 (tags/v3.9.5:0a7dcbd, May  3 2021, 17:27:52) [MSC v.1928 64 bit (AMD64)] on win32
Type "help", "copyright", "credits" or "license" for more information.
>>> from canlib import canlib, Frame
>>> ch = canlib.openChannel(channel=1)
>>> ch.setBusOutputControl(canlib.Driver.SILENT)
>>> ch.busOn()
>>> frame = Frame(id_=123, data=[72, 69, 76, 76, 79, 33])
>>> ch.write(frame)
这不会导致python解释器中的任何错误,但如果我们查看Kvaser CAN通讯仪,通道led将闪烁为红色,表示出现错误(请参阅下图,哪个led闪烁取决于哪个通道遇到错误)。当我们查看完闪烁的指示灯,请按以下步骤关闭总线:
>>> ch.busOff()
>>> ch.close()
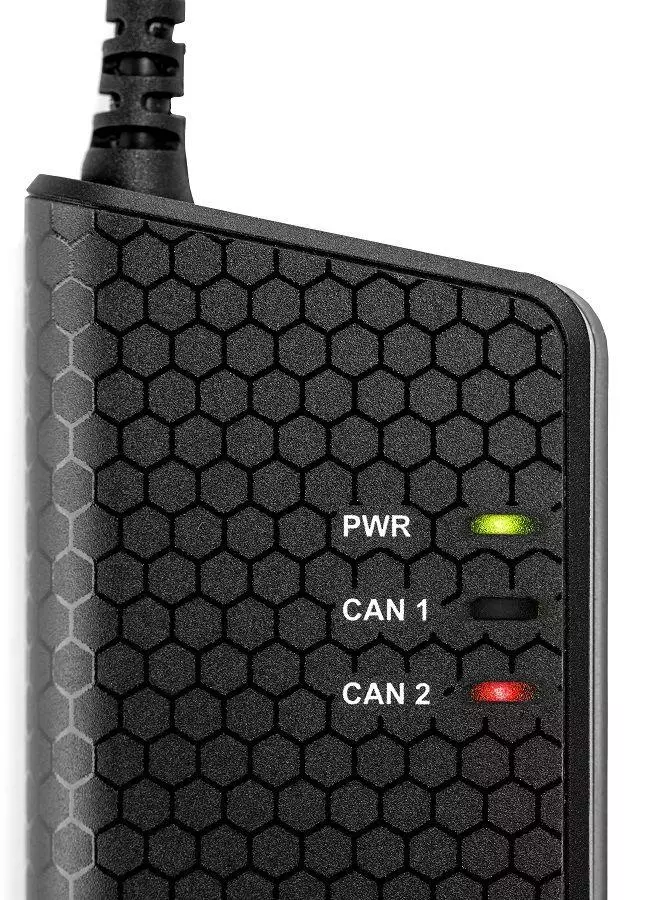
连接到计算机的Kvaser CAN通讯仪(由PWR的绿灯指示)在其第二通道上接收到错误(由CAN 2上的红灯闪烁指示)。
为了在解释器中接收到错误,我们需要同时发送更多的报文。为此,我们将使用for循环来包围write()命令(仍然在powershell内使用Python解释器):
> .\.venv\Scripts\activate
(pyproj) PS C:\Users\extac\Pyproj> py
Python 3.9.5 (tags/v3.9.5:0a7dcbd, May  3 2021, 17:27:52) [MSC v.1928 64 bit (AMD64)] on win32
Type "help", "copyright", "credits" or "license" for more information.
>>> from canlib import canlib, Frame
>>> ch = canlib.openChannel(channel=1)
>>> ch.setBusOutputControl(canlib.Driver.SILENT)
>>> ch.busOn()
>>> frame = Frame(id_=123, data=[72, 69, 76, 76, 79, 33])
>>> for i in range(2000):
...     ch.write(frame)
Traceback (most recent call last):
  File "<stdin>", line 2, in <module>
  File "C:\Users\extac\Pyproj\.venv\lib\site-packages\canlib\canlib\channel.py", line 718, in write
    dll.canWrite(self.handle, frame.id, bytes(frame.data), frame.dlc, frame.flags)
  File "C:\Users\extac\Pyproj\.venv\lib\site-packages\canlib\canlib\dll.py", line 177, in _error_check
    raise can_error(result)
canlib.canlib.exceptions.CanGeneralError: Transmit buffer overflow (-13)
>>> ch.busOff()
>>> ch.close()
对于下一个示例,我们需要添加第三个通道,以便能够发送报文,并使用静默通道读取报文。请注意,为了能够使用静默通道,必须至少有两个其他通道可以正常发送和接收报文。在本指南中,我们将添加一个Kvaser Leaf Pro HS v2,但任何其他至少有一个通道的CAN通讯仪都可以。要查看是否有两个以上的通道可用,请再次运行脚本check_ch,对于本示例,结果如下:
	(pyproj)> py check_ch.py
	Found 5 channels
	0. Kvaser USBcan Pro 2xHS v2 (channel 0) (00752-9:13406/0)
	1. Kvaser USBcan Pro 2xHS v2 (channel 1) (00752-9:13406/1)
	2. Kvaser Leaf Pro HS v2 (channel 0) (00843-4:10012/0)
	3. Kvaser Virtual CAN Driver (channel 0) (00000-0:0/0)
	4. Kvaser Virtual CAN Driver (channel 1) (00000-0:0/1)
与上次运行check_ch时相比,虚拟通道已从2和3降至3和4。CAN通道2已被新添加的Kvaser Leaf Pro CAN通讯仪占用。
下一步是使用两个正常通道发送报文并使用第三个静默通道进行监听。再次回到CAN报文示例并添加代码,此脚本将被命名为silent_listen:
# silent_listen
from canlib import canlib, Frame

# Open a third channel (channel 2) and name it ch_c.
ch_a = canlib.openChannel(channel=0)
ch_b = canlib.openChannel(channel=1)
ch_c = canlib.openChannel(channel=2)

# Set ch_a and ch_b to normal, again unnecessary but to clarify,
ch_a.setBusOutputControl(canlib.Driver.NORMAL)
ch_b.setBusOutputControl(canlib.Driver.NORMAL)
# and ch_c to silent.
if canlib.ChannelCap.SILENT_MODE in ch_c.channel_data.channel_cap:
ch_c.setBusOutputControl(canlib.Driver.SILENT)
else:
    exit()

# Put the third channel ch_c on the bus.
ch_a.busOn()
ch_b.busOn()
ch_c.busOn()

frame = Frame(id_=123, data=[72, 69, 76, 76, 79, 33])
ch_a.write(frame)

# Add ch_c to read the message as the silent channel to read the message.
msg_c = ch_c.read(timeout=500)
msg_b = ch_b.read(timeout=500)

# Print both messages to compare them.
print("msg c:”)
print(msg_c)
print("msg b:”)
print(msg_b)

# Go off bus with all three channels.
ch_a.busOff()
ch_b.busOff()
ch_c.busOff()

# Lastly, close all channels.
ch_a.close()
ch_b.close()
ch_c.close()
在powershell中运行该脚本将产生以下结果:
(pyproj)> py silent_listen.py
msg c:
Frame(id=123, data=bytearray(b'HELLO!'), dlc=6, flags=<MessageFlag.STD: 2>, timestamp=2)
msg b:
Frame(id=123, data=bytearray(b'HELLO!'), dlc=6, flags=<MessageFlag.STD: 2>, timestamp=5)
我们现在可以看到,静默通道ch_c可以读取报文,ch_b也读取了报文,报文不再是错误信息。在此示例中,静默通道并不是必需的,但这让我们了解了如何使用它。
设置总线参数
有多种方法可以设置总线上的总线参数。在本指南中,我们将只关注使用预定义总线参数来设置、检查和更改通道的CAN比特率,有关所有预定义参数的列表,请转到 pycanlib.readthedocs canlib.canlib.Bitrate。要设置比特率,请使用setBusParams()和canlib.Bitrate.BITRATE_xK作为输入,其中x是所需的比特率。在设置比特率之前,我们将在之前使用getBusParams()来获取标准参数,然后再使用getBusParams()查看参数是否已更改。
请注意,发送和接收通道都必须使用相同的比特率。否则,我们将收到错误报文,红灯将开始闪烁。在以下示例脚本中,我们将使用发送报文示例,添加setBusParams函数并调用它change_bitrate。
# change_bitrate
from canlib import canlib, Frame

ch_a = canlib.openChannel(channel=0)
ch_b = canlib.openChannel(channel=1)

# Use getBusParams and print the result to see the preset parameters on both
# channels.
print(ch_a.getBusParams())
print(ch_b.getBusParams())

# After opening both channels we will call upon the setBusParams to change the
# bitrate of the message. From the list of predefined we will use BITRATE_100K
ch_a.setBusParams(canlib.Bitrate.BITRATE_100K)
ch_b.setBusParams(canlib.Bitrate.BITRATE_100K)

# Use getBusParams and print the result to see that the parameters changed on
# both channels.
print(ch_a.getBusParams())
print(ch_b.getBusParams())

ch_a.busOn()
ch_b.busOn()

frame = Frame(id_=123, data=[72, 69, 76, 76, 79, 33])
ch_a.write(frame)

msg = ch_b.read(timeout=500)
print(msg)

ch_a.busOff()
ch_b.busOff()

ch_a.close()
ch_b.close()
	> .\.venv\Scripts\activate
	(pyproj)> py change_bitrate.py
	(500000, 4, 3, 1, 1, 1)
	(500000, 4, 3, 1, 1, 1)
	(100000, 11, 4, 1, 3, 1)
	(100000, 11, 4, 1, 3, 1)
	Frame(id=123, data=bytearray(b'HELLO!'), dlc=6, flags=<MessageFlag.STD: 2>, timestamp=3)
我们现在可以清楚地看到,两个通道在更改之前具有相同的预设参数,然后在更改之后仍然具有相同的参数。通常情况下,比特率不会更改,因此作为快捷方式,可以在调用openChannel时设置比特率,如下所示:
ch_a = canlib.openChannel(channel=2, bitrate=canlib.Bitrate.BITRATE_100K)
LED
所有Kvaser通讯仪都有LED,用于指示通讯仪是正常工作还是出现错误。我们可以使用flashLeds和不同的操作和LED来测试这些LED。操作包括打开和关闭所有LED或打开或关闭所有LED。有关可用操作的完整列表,请前往pycanlib.readthedocs canlib.canlic.LEDAction。请注意,并非所有操作都适用于所有Kvaser通讯仪,因为这些通讯仪具有不同数量的LED和通道。我们将使用Kvaser USBcan pro 2xHS v2来测试flashLeds,使用python解释器运行以下命令(在执行flashLed命令时,请确保同时查看CAN通讯仪的LED):
	> .\.venv\Scripts\activate
	(pyproj)> py
	Python 3.9.5 (tags/v3.9.5:0a7dcbd, May  3 2021, 17:27:52) [MSC v.1928 64 bit (AMD64)] on win32
	Type "help", "copyright", "credits" or "license" for more information.
	>>> from canlib import canlib
	>>> ch = canlib.openChannel(channel=0)
	>>> ch.flashleds(canlib.LEDAction.ALL_LEDS_ON, 10000)
	>>> ch.flashleds(canlib.LEDAction.ALL_LEDS_OFF, 10000)
在上面的代码中,我们执行了操作0和1。操作0是打开所有LED,而操作1是关闭所有LED。LED“闪烁”多长时间取决于第二个整数。在本例中,10000,表示10000毫秒,即10秒。这让我们有足够的时间清楚地看到LED是否正常工作。
接下来,我们将一次打开一个LED。这样,我们就可以看到,每个LED的“孔”都有两个不同颜色的LED。在下图中,我们可以看到不同的LED(白色的)在盖子内的电路板上是什么样子的。
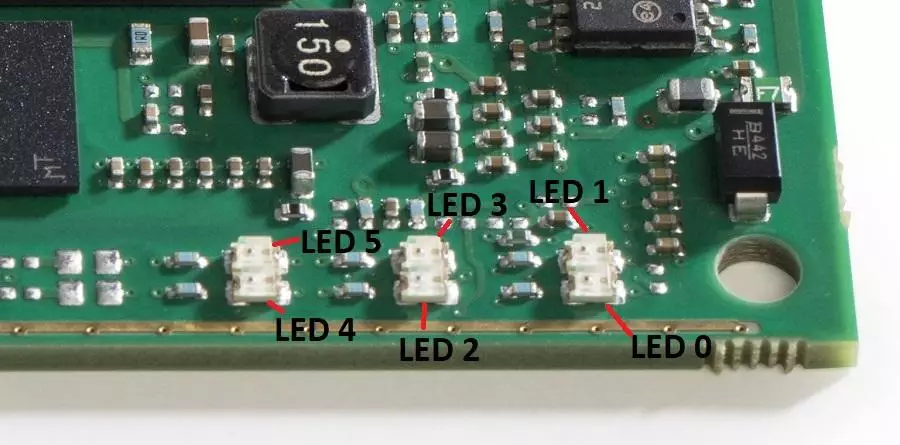
在Kvaser CAN通讯仪的内部,我们可以看到该特定通讯仪上的六个LED,该通讯仪有两个通道(每个通道有两个LED对和两个PWR LED)。每个LED的指定编号如图所示。
在本例中,我们将打开LED 2和3,这是CAN 1的两个LED,这两个LED是LED 2和3,颜色分别为红色和黄色。在Python解释器中使用以下代码:
	>>> ch.flashLeds(canlib.LEDAction.LED_2_ON, 10000)
	>>> ch.flashLeds(canlib.LEDAction.LED_3_ON, 10000)
如果我们使用PWR的LED,颜色将是绿色和黄色(分别为LED_0_ON和LED_1_ON)。
查找设备
在canlib中有一个名为“Device”的类别,可以用来查找和跟踪物理设备。Device类别表示一个物理设备,无论它当前是否连接,以及连接在哪个通道上。如果设备已连接,请使用Device.find来查找设备并获取设备对象。要搜索设备,可以使用EAN和序列号。打开虚拟环境,启动python解释器,并运行以下命令:
	> .\.venv\Scripts\activate
	(pyproj)> py
	>>> from canlib import Device, EAN
	>>> Device.find(ean=EAN('73-30130-00752-9'))
	Device(ean=<EAN: 73-30130-00752-9>, serial=13406)
	>>> Device.find(serial=13406)
	Device(ean=<EAN: 73-30130-00752-9>, serial=13406)
Device.find将搜索并返回与输入参数匹配的第一个设备。在前面的示例中,我们搜索了EAN为73-30130-00752-9和序列号为13406的第一个设备。
如果想要的设备当前未连接,可以使用其EAN和序列号(唯一标识特定设备所需的最小信息)创建设备对象。对于EAN编号,只需要最后六个数字,因为前七个是默认的,在所有通讯仪上都是相同的。要创建设备,请在python解释器中运行以下代码:
>>> dev = Device(ean=EAN('67890-1'), serial=42)
创建新设备并通过USB连接到计算机后,我们可以使用probe_info获取其(或任何其他设备)信息:
	>>> print(dev.probe_info())
	CANlib Channel: 2
	Card Number   : 0
	Device        : Kvaser USBcan Pro 2xHS v2 (channel 0)
	Driver Name   : kcany0a
	EAN           : 73-30130-00752-9
	Firmware      : 3.25.0.753
	Serial Number : 13406
Device.find还可以用于打开特定连接通讯仪上的通道,而不管它被分配在哪个CANlib通道号上。为此,请调用Device.find然后open_channel。这将自动打开通讯仪上的第一个本地通道:
	>>> dev = Device.find(ean=EAN(‘00752-9’))
	>>> ch = dev.open_channel()
现在,可以像使用canlib.openChannel(channel=x)打开的任何其他通道一样使用Ch。
打开通道时,我们可以同时指定通讯仪上要使用的通道。这是通过chan_no_on_card完成的,它指定了通讯仪上的本地通道。确保chan_no_on_card整数小于通讯仪上CAN的数量(如果有两个通道,则整数应为0或1)。
>>> ch = dev.open_channel(chan_no_on_card=1)
>>> ch = dev.open_channel(chan_no_on_card=1, bitrate=canlib.Bitrate.BITRATE_100K)
通道和处理数据
Probe_info可以在设备对象上用于获取有关连接通讯仪的信息。Probe_info使用ChannelData函数,我们可以直接使用ChannelData函数,就像在check_ch脚本中所做的那样。除了ChannelData,我们还可以使用另外两种方法来获取有关设备或通讯仪的信息。
我们可以使用的第一种获取通道数据的方法是使用canlib.ChannelData(x),其中x是我们想要获取数据的通道。要运行此命令,我们需要在启动ChannelData之前启动虚拟环境和python解释器。在此示例中,我们将从通道0获取数据:
	> .\.venv\Scripts\activate
	(pyproj)> py
	Python 3.9.5 (tags/v3.9.5:0a7dcbd, May  3 2021, 17:27:52) [MSC v.1928 64 bit (AMD64)] on win32
	Type "help", "copyright", "credits" or "license" for more information.
	>>> from canlib import canlib
	>>> dat = canlib.ChannelData(0)
在数据对象创建并命名为dat之后,我们可以使用它从channeldata中获得任何我们想要的信息。有关可用数据的完整列表,请转到pycanlib readthedocs canlib.canlib.ChannelData。
然而,使用canlib.ChannelData需要我们知道通讯仪连接到哪个通道。这可能会变得麻烦,因为在删除和插入通讯仪时,它们很可能会更改通道号。因此,如果不知道通道,就无法使用ChannelData。相反,还有两种其他方法可以获取数据对象。一种方法是查找或创建名为dev的设备,并使用dev.channel_dev(),另一种方法是打开一个通道并使用ch.channel_data()。这两种方法都使用Python解释器:
	>>> dev = Device.find(ean=EAN(‘00752-9’))
	>>> dat = dev.channel_data()

	>>> ch = canlib.openChannel(channel=0)
	>>> dat = ch.channel_data()
在这两种选项中,dev.channel始终是正确的,也是最容易使用的。通过openChannel获取dat的结果与之前使用的check_ch.py脚本相同。
枚举
一旦我们导入了canlib.canlib,它会枚举连接的Kvaser CAN设备,我们可以调用getNumberOfChannels来获取系统中枚举通道的数量。如果我们在运行程序时同时连接和断开通讯仪,可能会出现问题。在程序内部,我们在引用CAN通道和通讯仪时使用通道。但如果我们在程序运行时添加或删除 任何通讯仪,这些更改不会影响程序。或者,在引用某个通道时使用了错误的通讯仪。请注意,只有在代码运行期间不断连接和断开设备时,才需要执行以下操作。
为了解决这个问题,我们将手动枚举可用的CAN通道。该函数是canlib.enumerate_hardware,用于根据当前连接的所有设备创建一组全新的CANlib通道编号。当前打开的通道句柄仍然有效可用。但是,使用此函数时,我们需要停止根据CANlib通道号引用设备,而改为使用通道类。因为每次调用enumerate_hardware时,通道号都会更改。相反,要检索有关特定通道的信息,请使用Channel.channel_data。
添加设备
如果我们在程序运行时连接设备,程序将无法识别是否连接了新设备。我们可以通过在虚拟环境和Python解释器内使用canlib.getNumberOfChannels来看到这一点(在此示例中,我们连接了一个USBcan并将连接一个leaflight):
	> .\.venv\Scripts\activate
	(pyproj)> py
	Python 3.9.5 (tags/v3.9.5:0a7dcbd, May  3 2021, 17:27:52) [MSC v.1928 64 bit (AMD64)] on win32
	Type "help", "copyright", "credits" or "license" for more information.
	>>> from canlib import canlib
	>>> canlib.getNumberOfChannels()
	4
接下来连接leaflight并再次运行getNumberOfChannels:
	>>> canlib.getNumberOfChannels()
	4
如果我们现在手动运行enumerate_hardware,然后运行getNumberOfChannels,我们会得到:
	>>> canlib.enumerate_hardware
	5
	>>> canlib.getNumberOfChannels()
	5
现在我们可以看到,不需要重新启动程序,新通道已被识别并可以使用。
删除设备
如果我们删除一个设备,将会遇到一些问题。首先,与连接设备时一样,在重新枚举连接的设备(枚举已运行)之前,程序不会识别已使用getNumberOfChannels删除的设备:
	>>> canlib.getNumberOfChannels()
	5
	>>> canlib.enumerate_hardware
	4
	>>> canlib.getNumberOfChannels()
	4
如果在删除设备之前已打开到设备的通道,则程序仍然会尝试使用程序运行的命令与设备进行交互。运行这些命令中的大多数都会导致错误,但也有一些命令仍然有效。为了显示这一点,我们现在将尝试使用打开通道后删除的通讯仪进行写入和读取。在运行读和写命令之前,需要在Python解释器中运行设置代码:
	>>> from canlib import canlib, Frame
	>>> ch_a = canlib.openChannel(0)
	>>> ch_a.busOn()
	>>> ch_b = canlib.openChannel(1)
	>>> ch_b.busOn()
	>>> frame = Frame(id_=123, data=[72, 69, 76, 76, 79, 33])
如果现在断开CAN通讯仪并尝试用其中一个已删除的通道写入帧,我们将得到硬件错误异常:
>>> ch_a.write(frame)
Traceback (most recent call last):
  File "<stdin>", line 1, in <module>
  File "C:\Users\extac\Pyproj\.venv\lib\site-packages\canlib\canlib\channel.py", line 718, in write
    dll.canWrite(self.handle, frame.id, bytes(frame.data), frame.dlc, frame.flags)
  File "C:\Users\extac\Pyproj\.venv\lib\site-packages\canlib\canlib\dll.py", line 177, in _error_check
    raise can_error(result)
canlib.canlib.exceptions.CanGeneralError: A hardware error was detected (-15)
要尝试使用已删除的通道读取报文,我们需要在删除通讯仪并运行读取代码之前再次运行设置代码。
>>> ch_a.read()
Traceback (most recent call last):
  File "<stdin>", line 1, in <module>
  File "C:\Users\extac\Pyproj\.venv\lib\site-packages\canlib\canlib\channel.py", line 718, in write
    dll.canWrite(self.handle, frame.id, bytes(frame.data), frame.dlc, frame.flags)
  File "C:\Users\extac\Pyproj\.venv\lib\site-packages\canlib\canlib\dll.py", line 177, in _error_check
    raise can_error(result)
canlib.canlib.exceptions.CanGeneralError: A hardware error was detected (-15)
当您插入新设备时,如果已经启动了程序,该设备将不会显示。
不必重新启动,使用enumerate。
请注意Canlib通道号“跳过”,但ch仍然有效。
自定义通道名称
当我们使用多个通讯仪和多个通道时,记住每个通道对应的是什么可能会变得困难。为了解决这个问题,我们可以为通道重命名并赋予它们自定义名称。要给通道自定义名称,我们需要使用Kvaser设备指南。在Kvaser设备指南中,右键单击要应用自定义名称的通道,然后单击“Edit Channel Name(编辑通道名称)”。这时一个窗口会弹出,您可以在其中输入通道名称,然后单击“ok”按钮以应用名称。要删除名称,只需再次打开更改通道名称窗口并删除插入的名称。请注意,更改将影响所有使用通道名称来识别设备的程序。设备也将重新启动以设置名称。
下一步是获取自定义名称并通过Python使用它。要获取名称,请使用canlib.getChannelData().custom_name。现在,我们将创建一个名为get_cus_name.py的脚本,以获取所有连接设备的自定义名称。在脚本中写入以下代码:
# get_cus_name.py
from canlib import canlib

num_channels = canlib.getNumberOfChannels()
for ch in range(num_channels):
    chd = canlib.ChannelData(ch)
    print(f"{ch}. {chd.channel_name}, Custom name: {chd.custom_name}")
如果安装了Kvaser USBcan,并且通道0具有自定义名称“Green”,通道1具有自定义名称“Red”,则将产生以下结果:
0. Kvaser USBcan Pro 2xHS v2 (channel 0), Custom name: Green
1. Kvaser USBcan Pro 2xHS v2 (channel 1), Custom name: Red
2. Kvaser Virtual CAN Driver (channel 0), Custom name:
3. Kvaser Virtual CAN Driver (channel 1), Custom name:
我们还可以使用自定义名称来打开特定的通道。要执行此操作,请编写以下名为open_channel_by_name的脚本,其中将包括同名函数以及用于确保其正常工作的测试。在此测试中,我们有一个具有自定义名称“USBone”的Kvaser USBcan,以及一个具有自定义名称“My leaf”的leaflight。在脚本中写入以下代码:
#open__channel_by_name
from canlib import canlib, Frame


# The function we will use to open a channel using the custom channel name.
# The custom name will be sent in as an input.
def open_channel_by_name(cust_name):
# Firstly, using a for-loop will be used to go through every connected device.
    num_channels = canlib.getNumberOfChannels()
    for i in range(num_channels):
        chd = canlib.ChannelData(i)
# For every device connected their custom name is compared to the input name.
# If the names are the same, the channel is opened and named ch.
        if cust_name == chd.custom_name:
            ch = canlib.openChannel(i)
            break
# If we do not find a channel with the input name as a custom name, the
# following message is shown and the exception CanNotFound is raised.
    else:
        print(f"Channel with custom name {cust_name} not found”)
        raise canlib.CanNotFound
# The opened channel named ch is returned by the function.
    return ch

# We will now test the function by opening two channels using their custom
# name and sending a message between them. THe channels we will try to open is
# the first channel on a USBcan with the custom name USBone and the channel on
# a leaflight with the name My Leaf. The channels will be named ch_b and ch_a
# respectively.
ch_b = open_channel_by_name("My Leaf”)
ch_a = open_channel_by_name(“USBone")
ch_a.busOn()
ch_b.busOn()
frame = Frame(id_=123, data=[72, 69, 76, 76, 79, 33])
ch_a.write(frame)
msg = ch_b.read()
print(msg)
ch_a.close()
ch_b.close()
# After successfully sending a message we will see what happens when we try to
# open a channel with a custom name that does not exist.
ch_a = open_channel_by_name("USBoe")
基本错误的故障排除
在使用Python canlib和CAN通讯仪时,我们可能会遇到多种错误和问题。现在,我们将讨论一些常见的错误报文和问题:
- 红色闪烁灯:快速闪烁的红色CAN灯表示接收到了多个错误帧,这意味着在报文传输过程中可能发生了问题。可能出现的三种问题是:
- 只有一个通道连接到CAN总线(连接到T-cannector)。
- 只有一个通道处于总线开启状态(该通道已经执行busOn())。
- 接收或传输总线处于静默模式。
要解决此问题,首先关闭接收到错误信息的通道的总线,以使红灯停止闪烁。然后确保至少有两个通道连接到T-cannector,并在总线上处于正常模式,一个用于发送报文,一个用于接收报文。
- 没有可用报文(-2):当我们在没有发送报文或发送报文出错的情况下调用read()时,会发生此错误,例如,因为它的比特率不正确。这可能是因为write()未被调用或传输通道处于静默模式,导致报文未发送。要解决此问题,请确保已使用帧正确调用了write()、传输通道处于正常模式,并且比特率与接收通道使用的比特率相同。
- 传输缓冲区溢出(-13):当我们试图发送许多信息但全部失败时,这些信息将在传输缓冲区中“排队”。这将导致以后的所有报文也发送失败,尽管发送是正确的。如果通道处于总线上,LED将开始闪烁红色。这可能是因为使用静默设备发送了许多报文或使用不在总线上的设备发送了报文。如果通道在总线上但是静默的,红灯会开始闪烁。要解决此问题,首先通过关闭总线再打开总线来清除传输缓冲区(还可以将设备断开连接并重新连接到计算机)。如果这不能解决问题,请确保所有总线都处于总线上,可以使用.busOn或者检查通讯仪是否连接到T-cannector上。
- 检测到硬件错误(-15):如果我们尝试与未连接的设备交互,将收到此错误通知。最有可能的情况是设备未通过USB连接,程序启动后被移除,或者某行代码在某处调用了错误的设备。要解决此问题,请仔细检查所有设备是否通过USB连接,如果还不行,请仔细检查用于识别设备的所有代码。
- 发生超时(-7):超时是当用户设置程序等待某个事件发生的超时限制时引发的错误。如果等待时间太长,将引发错误,我们就会知道出了问题。要解决这个问题,我们需要仔细检查代码以找到问题。问题可能是写入通道不在总线上或处于静默模式。
获取信息的途径
有多种方式可以获取有关CANlib的信息。有关canlib和与canlib一起使用的命令的最佳信息来源是pycanlib.readthedocs.io。如果readthedocs无法正常工作,那么Kvaser的网站Kvaser.com上有多个博客解释了canlib的不同方面。在Kvaser网站上,我们还可以在支持页面和canlib网络帮助中找到更多信息,包含开始使用Kvaser硬件的基本资源、用户指南等文档、开发者工具以及用于计算比特率的计算器。如果您没有找到所需内容,请将您的问题和疑问通过电子邮件发送至SUPPORT@KVASER.COM,随时联系我们获得支持。
例如,在前面的脚本中,我们想要读取报文。但是在报文被正确接收和读取之前,我们不希望继续执行下一行。此外,如果无法读取报文,我们还希望程序停止并返回错误报文。要找到实现这一点的最佳方法,请参阅pycanlib.readthedocs上的文档。
为了找到正确的文档,首先我们需要展开“Using canlib”选项卡。下一步是了解使用方式和用途。目前,我们要发送一条报文,刚好有一个名为“Send and Receive”的选项卡,我们可以展开它。接下来,我们看到“Reading Messages”也是一个标题,那么点击它,直接转到读取报文。在“read”标题下阅读时,我们最终会看到一系列功能列表。其中一项功能如下:“If you want to wait until a message arrives (or a timeout occurs) and then read it, call read with a timeout(如果要等到报文到达(或发生超时)然后读取它,请调用带有超时的read)”。这看起来就是我们所需要的。要了解更多关于该函数的信息,我们可以单击标有“read”的链接直接转到“read”函数。现在我们可以看到“read”有一个名为“timeout”的参数,它是一个整数。该整数决定程序在返回超时错误之前等待报文传递的毫秒数。现在我们已经找到了我们要找的内容,可以将其输入到我们的代码中,例如channel.read(timeout = 500),以使程序等待500毫秒。